How to Move a Pool Table: Tips for Moving
Pool tables are not only big, they are one of the heaviest items in homes. Moving them incorrectly can result in damage to the table, collateral damage to homes and furniture from bumps and drops, or worse still harming the person attempting the move. It needs to be done properly to be done safely, whether that’s moving it around the home, moving it to a new location, or putting it into storage for a while.
Whilst we are talking about pool tables, many of the same principles will apply to billiards and snooker tables – although the games are different, many people play them using any table.
It is possible to move a pool table without professional help, but it pays to be well aware of what´s involved in moving your own pool table.
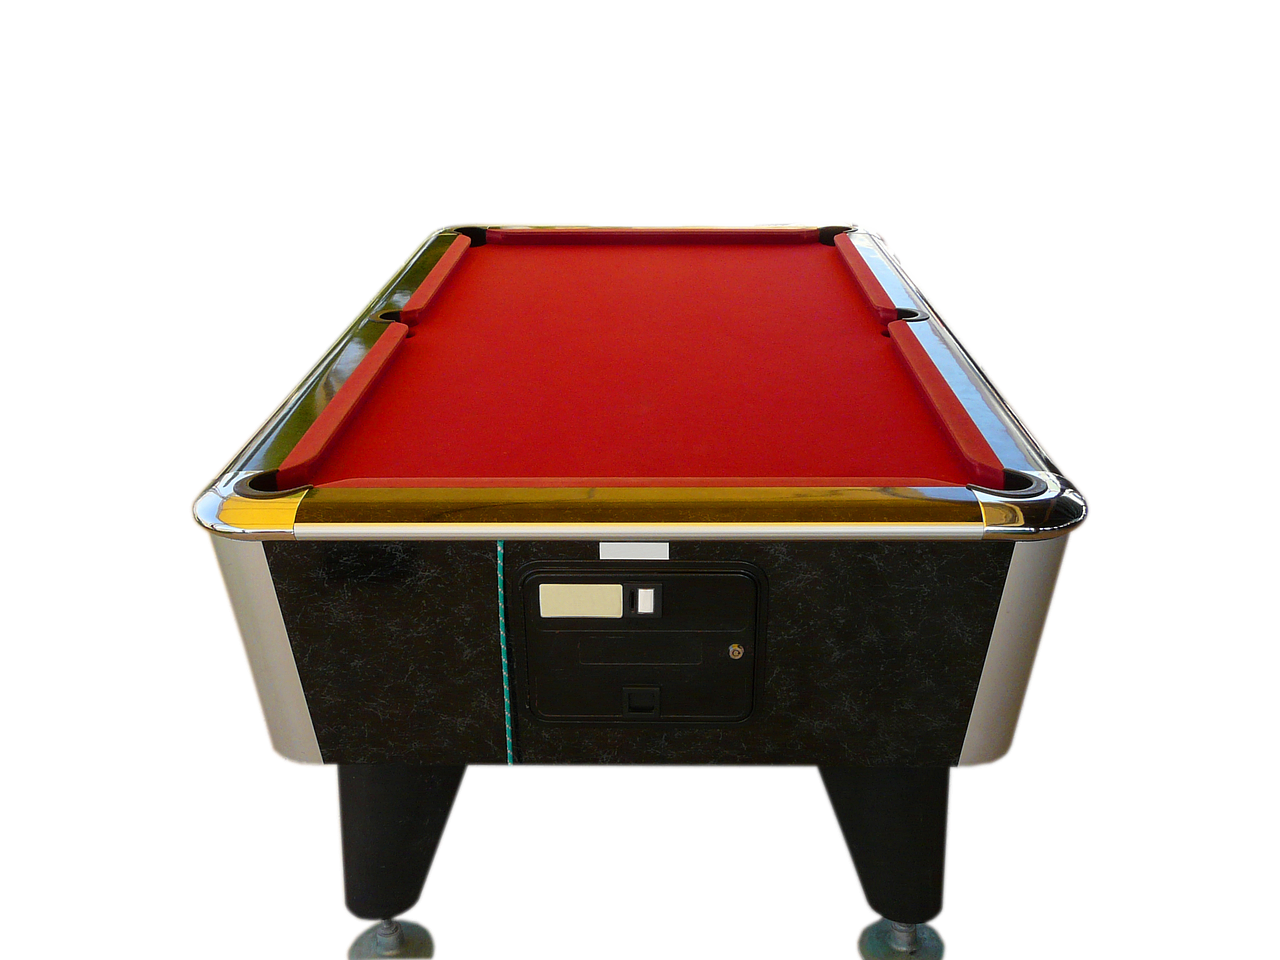
Move Your Pool Table Safely: The size of the challenge
Billiards and pool are usually played on a seven to eight-foot table. Professional billiards tables are larger than pool tables at nine feet in length. Snooker tables are bigger, especially in the UK and can measure up to 12 feet.
A 7-foot pool table will measure 39/40 inches by 78/80 inches with a table weight of 700 to 900 pounds (50 stone). An 8-foot pool table rises to 44 inches by 88 inches long or 46 inches wide by 92 inches long for a pro table. This will weigh in at roughly 850 to 1,200 pounds. By the time we are talking about a 9-foot table, we are talking about measurements of 50 inches wide by 100 inches long, weighing in at a whopping 1,000 to 1,500 pounds.
The weight and size of a pool table can vary considerably, and primary factors include the size and depth of slate and the wood used in construction, and where in the World you are (US, UK, Europe, Australia for example). This can also vary with the age of the table. Modern 7–8′ American pool tables have one solid piece of ¾ inch slate. Older 8′ tables are often made of thicker slate in three pieces.¡. Professional size 9′ tables usually have at least 1″ slate and at least a 3/4″ wood backing frame. Older tables can be found with up to 2″ thick slate in five sections.
Moving something of this scale needs proper consideration and planning, and many people decide to use moving professionals. Before even trying to move a pool table, assemble the essential tools and supplies required for a successful pool table move. These include moving blankets, furniture dollies, a socket wrench, a power drill, screwdrivers, a staple gun, and bubble wrap. Having these items on hand will make the process smoother and more efficient.
Preparation to Move a Pool Table
Fail to prepare, prepare to fail!
Among the most common results of poorly moved tables are broken slates and sheared off legs, which, aside of the inconvenience, can prove expensive to repair.
If you are only moving the table a short way, in the same room or close by, a furniture dolly, sliders and lots of strong arms may be good enough to do the job.
Put enough furniture sliders/moving pads under the legs of the table to support its weight evenly and to help it slide easily across the floor.
Raise one side of the table. Slide the dollies underneath and roll it to where it needs to be.
But for anything further, take heed and do the job properly.
1. Measure
Plan your exit at the ´leaving´ end of the move first. A tape measure is your best friend.
If doorways aren´t wide enough for the table, you may need to remove doors, even door frames. You will also need to plan to move all obstacles from the route beforehand.
Once you know what the plan is at the ‘leaving end’, take a look at where the table is going to: are the doors wide enough there? How, when, and where will you access? Where, at the new venue, is the table going to be placed? Are there obstacles to be moved?
Check it out and create a list of jobs to be done: try and complete them before the moving begins – you do not want the parts to be balanced somewhere whilst waiting for things to happen.
The quicker and smoother the move, the less likely there are to be damages to the table.
2. Get the tools ready
You will need:
- A furniture dolly;
- Plenty of protective blankets and (optional) bubble wrap;
- Tools: a power drill, screwdriver(a power one may be useful) and a socket wrench;
- A staple remover (for the pool table’s felt).
You should also have small bags or boxes ready to take any screws etc that you remove and some painters tape that will allow you to stick them to the leg or pockets they came from but peel away easily.
Ensure that you also have enough packing blankets and bubble wrap for protection.
3. Plan the transport
In the same way as you have looked to see that the table can exit and access the locations it´s leaving from and to, it´s just as important to ensure that the vehicle it´s being transported in can manage its size and weight.
Often even a larger car will be inadequate for the size and weight of a pool table, and it may be necessary to hire. If a removal company is taking the snooker table as part of load, warn them! Make sure the moving truck is strong enough to get a pool table to its new home.
4. Line up helpers
The more help you can get for the move, the better, but make sure you have a manageable number whilst disassembling and reassembling.
Tea and coffee monitors will be just as valuable to assist with the move as the people with screwdrivers or muscles, but make sure everyone knows what they are doing before beginning.
It´s the people who will determine the success (or otherwise) of the move!
Disassemble the Pool Table
Whilst it may be tempting to simply turn the table onto its side for moving, it is always safest (for people and table) to disassemble it.
Be warned that this is a time-consuming job, so allow at least four hours, or better still start in the morning expecting to take all day. This is, as you will read, not a one-person job.
As you take the parts off the table, use the packing blankets and bubble wrap to protect the parts.
The first job is to remove the pockets - a flat head screwdriver is recommended for removing the plastic parts. Pack safely into a bag, using bubble wrap for protection, unless the table will remain dissembled for a long time, in which case use a cloth wrapping for protection.
Next, the rails need removing:
Bolts, usually found on the underside of the table, will need removing in order to be able to lift the railings clear. A socket wrench is usually the right tool for this, and as the bolts are removed they should be put into the a labelled bag;
Brackets usually need removing first.
After corner brackets/castings are removed, mitres can follow. (Usually a drill and a screwdriver combination get the job done.)
Pocket castings can be removed with a racket wrench. Don´t forget to bag them up and label them.
Lifting the railings from the table needs at least two people to lift clear of the felt and to prevent breakage.
Each side of the pool table will usually have ‘aprons’ with bolts that need removing holding them in place.
Removing the felt is hard. If it´s stapled, use a staple remover, but if glued it may be impossible to remove without ripping. If you´ve managed to remove it cleanly, roll it to move it. Re-locating the felt is difficult as it will have been stretched in certain directions for fixing and with play, to say nothing of gluing and stapling.
But if removing the felt is hard, if not done with care, removing the slate is even tougher and can lead to problems later if not done properly. To move the slate, from the table, first remove and carefully bag and mark up the slate screws (the screws holding the slate). Mark the slate pieces(top of the slate) so that you can put them back in exactly the right order. It can help to mark the wood frame with matching marks to help identify what piece goes where. Lift the slate from the frame with care - slate is very heavy.
Finally, dismantle the table frame (base) if required, removing the legs of the pool table if needed. If when planning it became obvious that the base can move easily intact, fabulous: that´s one less reconstruction worry. If it needs dismantling, the same general rules apply – keep small pieces like nuts, bolts, screws etc in marked bags, and mark on the wood what goes where for when you are reconstructing.
Wrapping parts
Fix moving blankets and bubble wrap around the dissembled parts to protect them from bumps and scrapes during the move.
Transportation
When the time comes to move, ensure all the ways are cleared and the transport is ready to receive, carefully load the pool table and its parts. Use straps to stop things from sliding around, bumping or falling.
Make sure everyone wears appropriate clothing, especially sturdy shoes. Parts are heavy and can cause painful injuries.
It´s worth sending an advance party from the table to the transport before lifting a single thing, to ensure that all doors are open (protected with bubble wrap if the gap is a tight one), that any obstacles are cleared, and that pets and children are out of the way.
Reassemble the Pool Table
In the reverse order of taking apart, carefully put the table back together.
Normally this will be re-affixing legs to frame, attaching the slate to the frame, and then securing pockets, rails and felt.
The felt will be the trickiest part – be sure to look up instructions online. As felt stretches and thins, it may be a good time to consider re-felting.
A Change of Heart?
Having seen what´s involved when you move your table, even if you are only moving the table a short distance, there´s no shame in requesting professional help. Hiring professional movers could protect your investment and ensure the table is moved safely.
Storing a pool table
If you need to store the pool table, Pink Storage is here to help in locations across Wales and North West England, offering both drive up facilities and strong security.
 Scott Evans
Scott Evans is the Managing Director of Pink Storage and has many years of experience in the Self Storage Space. Scott has been featured on websites such as MSN, Yahoo, Wales Online, Daily Mail, The Express, The Mirror and many more by sharing his knowledge on everything storage.
Latest Popular Posts
New Tax Year: a Great Time to Review What Information to Store, and for How Long
A guide to what information businesses should be keeping

Pink Storage Opens New Self Storage Facility | Self Storage in Telford gets a boost as Pink Storage Opens
Discover Pink Storage's new self-storage facility in Telford, marking the company's 20th facility and helping a local industrial estate continue its renewal and development, celebrated with a 75% discount for new users!

How to Move a Piano Safely
Learn how to safely move a piano without professional movers. Our guide covers the best techniques, tools like a dolly, and tips to avoid scratches on your piano.
How Self Storage Supports E-Commerce Growth
Customer satisfaction wins to be had